

Critical-Gaming Pikmin Course: Week 5
As you probably have guessed, for this week's lecture the chairs were spread out all throughout the classroom area with each seat being as far away from each other as possible. When I took my seat and looked over at my friend Chang sitting in the nearest seat, I noticed for the first time how large the classroom space was. Today's lecture was all about macromanagement (macro) and seeing the big picture. Whether you're dealing with a game like StarCraft, Advance Wars, Smash Brothers, or even Tetris understanding the big picture means understating the game itself including how all of its many parts fit together.
Professor K explained to the class that today's lecture would be the most detailed and hardest lecture of the entire course. He continued by saying that if we don't grasp the ideas presented today, we'll never understand the true results of our in game actions. We'll never understand what puts Pikmin's core design on the same elevated level as StarCraft.
ECONOMY
Pro.K explained that most strategy games (real time or turn based) feature some kind of currency like resource. StarCraft has minerals and gas. Advance Wars has funds. But in Pikmin, there is no currency of any kind. And with no currency, there's no functional economy. There are only Pikmin units, and these units simplify everything.
Pikmin come from a variety of sources. Harvesting Cherries, enemy carcasses, and flower pellets are all ways to amass more Pikmin. Overall, there is no consistency in the rate of acquiring more Pikmin. With no consistency, there's no point in charting the growth rate. And with such a low cap on units (50 Pikmin) thinking about the economy (growth rate of Pikmn) in Pikmin isn't worth going into much detailed.
DIGGING UP & RETRIEVING
The point the professor made here was an interesting one. If we think about Pikmin like our most useable resource that we reasonably can't win a game without, then we can think of every action that involves Pikmin as spending or gaining Pikmin. The reason this works, we're told, is because any action that involves Pikmin is also tied to space and time. In StarCraft you can spend hundreds of mineral credits in the blink of an eye with hot keying and some fancy finger work. But in Pikmin it takes much longer to spend Pikmin and gaining them is a much more complicated endeavour than mining minerals/gas because of how space is folded.
Let's say your Avatar unit is standing in the center of a map with a large group of Pikmin to use. As long as these Pikmin are in your party, they're not doing much. It's important to think that their potential to do work increases the larger the group is and the farther away you are from your base. Pro.K reminded us that the reason this is is because moving targets from the opponent's half of the field to you half has a multiplied effect. This was detailed in week 3. Also, Pikmin can carry targets, kill, and dig up objects faster in larger groups. Faster equals more potential.
The graph of Pikmin potential shows a curve that's high near the opponent's base and swoops down closer to you base (see the black line in the image below). For every Pikmin you lose in battle (PvP or otherwise) you lose some of your potential work force. On the graph, losing Pikmin would lower the size of the hump while dropping the starting position of the graph along the Y axis. This effect is instantaneous when a Pikmin dies. In other words, after a Pikmin dies there's nothing you can do to recover that lost potential without doing lots of work like going back to your base for the refund. If you lose too many Pikmin, the graph will look more like a straight line with very low potential no matter where you are in the field.
Now look at the graph when a group of let's say 5 Pikmin carry a target (yellow marble) back to the base. B2 is the opponent's base and B1 if your base. In general, the farther the carrier Pikmin get from the Avatar unit (standing in the field) and the closer they get to their base the less and less potential they have to do work. Instead of being able to do a lot of different things under the command of the Avatar unit, once the Pikmin move away from you they are stuck just carrying that one object until they reach the base. When Pikmin are waiting around under the Onion at your base, that's just wasted labor potential. The only good Pikmin is a working Pikmin, said Pro.K with a goofy grin on his face.
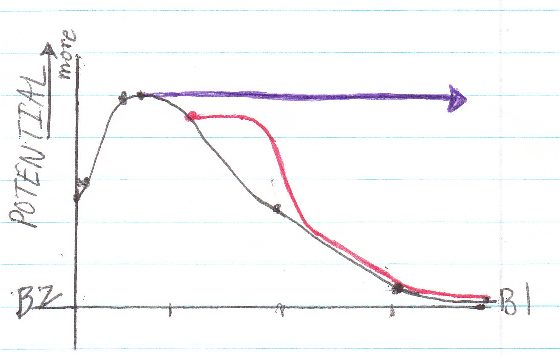
At this point in the lecture, the professor asked us to think of the data on the graphs a little more realistically. Because of folded level design, it becomes increasingly more difficult to maintain one's Pikmin work potential the closer you are to your opponent's base. Unless you really know what you're doing, being in your opponent's base is risky, desperate, and foolish. It's much safer to generally be in the area about half way between midfield and your opponent's base. Basically 3/4 away from your base. For this reason, the line for work potential increase moving from B1 to B2 and then tapers off when you move beyond the spot where the farthest yellow marble is location and you move opponent's base. In your opponent's base, the only game winning potential involves stealing the red/blue marble. Because this can be a riskier strategy, the potential drops significantly toward B2.
Likewise, the work potential just outside of your base (moving from B2 to B1) quickly levels off. After all, if you have an object within the doorway of your base, for the same reasons of folded defense, it's as good as yours. You don't necessarily have to waste the time carrying the object that little distance form the entrance of your base into the Onion and traveling back. So, there's a sort of sweet spot you can hang out in to maximize your work potential. This spot is about from midfield to 3/4 the distance between B1 and B2.
This is when Pro.K asked us an interesting question. If you're positioned at 3/4 field (half way into your opponent's half) and some of your Pikmin begin carrying a yellow marble back to your base when does the overall potential of your party start to drop off on the graph? Someone raised their hand and answered as soon as they start walking with the object. The girl who doesn't like math interjected that the potential would only drop off once the Pikmin pass the Avatar unit on the way back to the base because all commands (which equal the potential for doing work) come from the Avatar unit. I added that the commands don't emanate from where the Avatar unit stands. The entire circular range created between the Avatar unit and the cursor at maximum whistle size is actually the range of command. So the graph won't start to taper off until the Pikmin carriers are beyond the radius length of your cursor.
![]()
D1: cursor radius. D2: charge throw radius. D3: The extra distance Pikmin will pathfind to a Target.
The professor heartily laughed out loud while clapping his hands and grinning widely. He was very pleased with our responses. I thought you didn't like math, he said to the girl. She explained that she wasn't very good with numbers. The professor replied that numbers are just one language of math used to describe the same relationships that we all experience. Math isn't numbers. It's the relationships, functions, and movement of values. She seemed to be good enough at understanding the lectures so far. Before moving on, Pro.K added one more point to the range of the Avatar unit's command. He explained that by holding A and charging the Pikmin throw mechanic, you can extend the distance of the throw by approximately 2x the distance between the Avatar unit and the cursor. So, according to my diagram, the Pikmin would have to carry the Target for a distance of D3+D2+D1 before the potential to begin to drop off on the graph. See the red line in the graph above. And this is only for a stationary Avatar unit.
The reason it's important to understand the Avatar's range of command is because now you understand the dynamic of expansion or working well beyond your base in Pikmin. Essentially, if you put all of your Pikmin to work doing various tasks all around you maximizing their potential, you can use your Pikmin without spending them as long as you call them back to you as they reach the edge of the Avatar's command range (D1). It's like going to a restaurant trying a bit of everything and then walking out with a full stomach without paying because you didn't technically eat any one thing. With this approach, if you need to call your Pikmin together for whatever reason, they're still all around you ready for action. Understanding and utilizing this dynamic is the difference between a player who knows how to expand and one who will be countered easily.
Then the professor asked the class another question; So, what about digging up a marble? How does that look on the graph? To my surprise, my friend Chang answered this one. He said that digging up a marble has a negative effect on your potential because you're spending time and using Pikmin to work on a task that isn't advancing any targets to you base and therefore not bringing you closer to winning. Apparently, digging up a marble is very similar to rocks and other structures in StarCraft that players have to destroy to access specific areas. On that note, Advance Wars features destructible meteors that can block paths. In this game though, only strong units are practical choices for dealing with meteors and shooting them consumes precious ammo. Meteors can defiantly be a resource drain.
The professor agreed with Chang and noted that at any time, if you can get your opponent to do your work for you (like digging up a marble or attacking a pesky enemy) then let them waste their resources. Everything in Pikmin worth doing consumes some kind of resource. Before moving on Pro.K mentioned that if you can move deep into the field and shift every valuable resource available (except maybe the red/blue marble) back with you as you travel back to you base, you can keep your potential at near maximum while moving into a more advantageous position. This is what the purple horizontal line represents in my graph above. The professor explained that we might go over that possibility in more detail on another day.
WHAT TO ATTACK
The professor explained that a general tactic for just about any game from StarCraft, to Advance wars, to Smash Brothers is to attack your opponent(s) when they can't attack you back. If your opponent's shield breaks in Smash Brothers, you can take advantage of the situation and get a good solid hit off. In Advance Wars, if you attack long range units like the Artillery, Rockets, or Missiles you are in no danger of a counter attack. Likewise, some units can't attack air/sea/ground units (or some combination of those). If you can attack those units with a unit it can't attack back, that's another clear advantage.
In StarCraft, you attack things to win. More specifically, you attack buildings to win the game, and you attack enemy units so that you don't get attacked. Because one's economy gains funds exponentially as time goes on, attacking your opponent's means to gather funds can have a devastating effect on their income in the long run. Attacking buildings can force your opponent to rebuild that building or play on without it. Because units come from buildings, destroying them is one way to reduce the opponent's army potential. With both of these kinds of targets, the attacker has an advantage because mineral gatherers and buildings don't fight back very well. So when attacking them, you can do a lot of damage without losing a lot. The same is true for attacking enemy forces. However, because players tend to build and group their units in such a way as to preemptively cover for any obvious weaknesses like this, attacking enemies that can't attack back in StarCraft is rare. Plus, your opponent can always retreat. So when you're thinking about what to attack in StarCraft the order goes: workers -> buildings -> enemies that can't attack back -> enemies that can attack back.
When on the attack in Pikmin the same ideas apply. Boosting your Pikmin with an Ultra-spicy spray gives your forces such an advantage over normal Pikmin that it's possible for 10 boosted Pikmin to completely annihilate 50 unboosted Pikmin. Doing so is essentially attacking a target that can't attack back. You should always be on the look out for opportunities to wipe out large numbers of your opponent's forces.
The next best thing to attack are the Avatar units themselves. With a little aim and a few Pikmin, you can really harass your opponent. When your Pikmin begin chasing down the opposing Avatar unit, they are relentless in their pursuit. If they manage to latch onto the Avatar unit, a variety of bad things happen. While under attack, you are unable to throw Pikmin, use sprays, whistle, order Pikmin (C-stick), or pluck Pikmin from the ground. Once your Avatar is attacked by a Pikmin, all of your Pikmin in your party are dismissed as well. If there was a way to functionally slap the mouse away from your opponent in StarCraft, that would be analogous to mass Avatar swarming. Sure a sturdy spin of the analog stick dislodges the attackers. But doing so in only a temporary fix as the Pikmin simply get back on their feet and resume the attack. If you ever get 30-50 Pikmin swarming you like this, you may have a really hard time getting them off.
The next best thing to attack are enemy Pikmin units. If you have strength in numbers, you can confidently attack enemy Pikmin sending them back to their base as seeds. As noted previously, the further away the opposing Avatar is from their base, the greater effect taking out their Pikmin has.
Unless you really need the Pikmin from a harvested enemy carcass, killing enemies is not really worth your time. This is true when the enemies in the field aren't very dangerous and they're not blocking crucial paths that you Pikmin will surely take when traveling back to base. In fact, the only thing that's worse than killing enemies in the field is killing an enemy spawned from a Cherry. After 50 seconds these Cherry enemy units automatically die. When they do, they don't even leave behind a carcass to harvest for Pikmin seeds. Avoid attacking Cherry enemies unless you absolutely need to.
If you're ever confused as to what to attack in Pikmin the order is enemy Pikmin (while boosted), enemy Avatar, enemy Pikmin, enemy units, cherry enemies units. On that note, if you can figure out a way to attack the opponent's Pikmin with enemy units (cherry or otherwise), you stand to gain an even greater advantage because those Pikmin are not refunded. This powerful tactic involves counterpoint or the coming together of 3 or more opposing forces. Like in Super Mario Brothers where Mario, gravity, and enemies are all constantly working against each other to create rich and variable challenges/ experiences, making enemy units attack enemy Pikmin is inherently more complex and risky than a PvP battle because the enemies can hurt your Pikmin as well. This is part of the reason why it's a waste of time to kill enemy units in the field. Using them to attack your enemies is a much better idea. It is this kind of game design that makes Pikmin unique compared to other RTSs and what makes Pikmin a very Miyamoto/Nintendo game.
THE DYNAMICS OF PIKMIN
The most dynamic part of Pikmin is how everything comes together to create lots of interplay because of the dynamics of space. Like the Koopa animation design between super Mario Brothers and Super Mario World where the form of the Koopa walking back to its shell that creates an organic timer, the core dynamic of Pikmin (space and folded level design) is self explanatory in a visual way. All the counters and conditions are clear and visible. No need to learn multiple branches of buildings and units and how they interact. Everything you need to compete in Pikmin is out there in the field.
Now, I must communicate my failure to accurately record the graphs that were presented in class in my notes. The professor moved through them very quickly. Most of the concepts are simple enough, so I figured it would be best if I just explain them in words.
The first graph showed the relationship between the number of Pikmin in your party and the effectiveness of specific counters. Basically, the more Pikmin you have in your group the more effective the following strategies becomes:
- Using an Ultra-spicy spray on your Pikmin
- Being countered by an Ultra-bitter spray on your Pikmin
- Big losses from Volatile Dweevils and Bolder drops
- Chaser Pikmin chipping away and separating your forces
- Large Enemy units become more threatening in that they can gobble, step, or roll over many Pikmin at once.
Then we were shown another graph that showed the relationship between the number of groups you separate your Pikmin forces into and the effectiveness of another set of strategies. The thinner you divide your ranks, the more effective the following counters and strategies are:
- Multitasking to do several things at once.
- Creating speed bumps to slow down the opponent's forces.
- Being countered with enemy chaser Pikmin.
- Being swarmed by enemy Pikmin.
- Small Enemy units become more dangerous because you don't have a lot of forces to overwhelm them.
What's important to take away from these two graphs is that having many Pikmin in one group and having many different groups of Pikmin are inverses of each other. In other words, you can't have a lot of both. The more you push toward one approach, the less you do of the other. When you have few Pikmin like 1-10 or so, the difference between having a group of 10, two groups of 5, or three groups of 3 isn't that significant. But when you have 20-50 Pikmin, the effectiveness of your strategies and the counters to your approach can have a much larger affect on the game. There's no way to eliminate the possibility of being countered no matter how you organize/use your Pikmin. You must amass more Pikmin to compete, and when you do you're either going to lean more to the single large party, many smaller parties, or fall somewhere in the middle. If you hang out right in the middle of the two options, you'll be susceptible to both sets of counters (large group and many group counters), but their effects will be reduced somewhat.
There are more draw backs to over multitasking that were not discussed above. Because commands and actions are localized around the Avatar unit, the more groups you split your forces into and the more tasks they do, the more you have to juggle in real time. Unlike in StarCraft when you can zip around the screen as quickly as your fingers and brain can keep up, in Pikmin your ability to give commands is limited by the Avatar unit's sight, range, and movement speed. Coordinating more and more groups requires more and more skillful juggling. What's interesting here is that, if you can pull off a mass multitask, you become less susceptible to Ultra-spicy-bitter spray counters. Not only are the effects of those counters significantly reduced when used against small groups, but since the sprays are directly tied to the Avatar unit, you essentially force the opponent into a situation where he/she must waste time moving from area to area to try and get more use out of their 40 seconds of boosted Pikmin time.
Now consider how the tables can naturally turn against a player who multitasks a lot. The next graph showed how the Pikmin can be organized from a large group to many smaller multitasking groups. But as they bring objects back to the base and wait around under the Onion, the many groups turn back into one large group. Unlike being a large group traveling with the Avatar unit, these idle Pikmin waiting around at the base can be attacked from remote by Cherry spawned enemy units. Also, these idle Pikmin can also be lured out of the base following an enemy Avatar unit. This gives you the ability to lure them into danger or into some other hidden spot in hopes that they're never found and never used.
The final graphs simply highlighted what happens to some of the element in the battle field. Basically, Pikmin populations grow irregularly because of enemy carcasses and cherries that can boost your forces by 2-12 Pikmin seeds. There are a limited number of enemies at the start of a match and they slowly decline as they're killed. Shortly after the start of the match Cherries are dropped into the field. There must a set amount of Cherries in the field at all times. Once it goes up into your Onion, it's only a matter of a few seconds before another is dropped somewhere in the field again. If you control all of the enemies (either by defending them or harvesting them) and you control all of the Cherries, you can freeze the opponent's ability to get more Pikmin units. At this point, you can fight a battle of attrition.
Like in all games with balanced interplay loops (discussed in week 4), there's never a single best way to play. To be victorious, you must understand the gameplay dynamics and understand where you and your opponent is on the loop(s). Every move has a counter. And every strategy has its drawbacks. Like in nature, the folded level design in Pikmin creates cycles. Every action that you do or don't do has an effect on your possible strategies, counter strategies, and the environment. Understanding the core dynamics of Pikmin means understanding how each action can be converted to time and space in a layered ecosystem designed around 3 major opposing forces. Battles are won and lost over units as well as space in a way that's completely unique to the RTS genre.
That is the big picture of the 5th week of the Pikmin course. The professor actually went beyond class time to finish the lecture. When Chang and I left, everyone on campus was already walking about heading to their next destination. Some were going to eat. Others home. Others to their next class. I could see it all as one big fluid idea instead of hundreds of individual intentions. I guess that's what seeing the big picture is all about. It's calming in a way. I asked Chang if he would be back for week 6. He nodded almost to himself. I think our heads were still spinning from it all.
 Richard Terrell (KirbyKid)
Reader Comments (2)
Looks like the Potential Graph image is 404ing. Any chance of restoring it?
@Jake
Thanks for letting me know. I've fixed it now. Enjoy